Tag Archives: highlight

All About Our Lovely Lumilitez Highlighters!

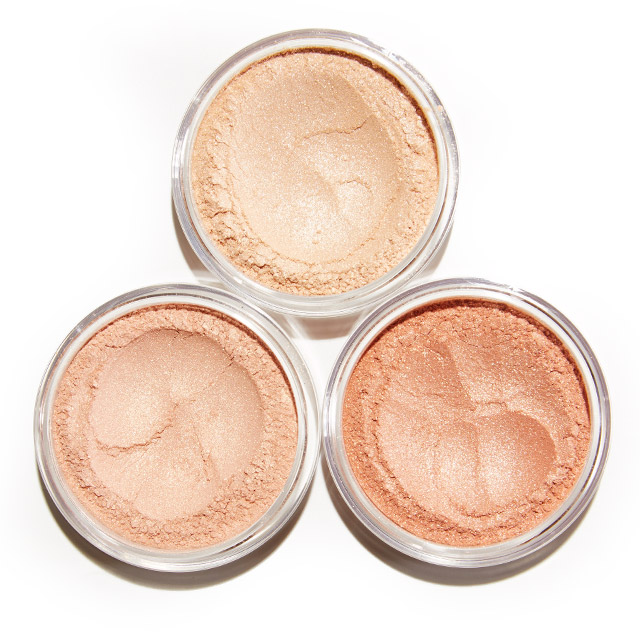
Here at PRIIA we offer two different versions of our LumiLitez Highlighters: creme and powder. Our creme LumiLitez come in the shades Aura and Luna, while our powder LumiLitez come in Moonglow, Starlight, and Sunburst. We offer different versions of our highlighters to allow our
customers to achieve varied results if they so wish.

Creme: When it comes to our creme highlighter, application is key. Whether you opt to use a makeup tool or your hands it is important to apply this product gently. Just dot it on the areas you want to highlight and then stipple it lightly with your clean finger or a stippling brush. Do not rub it on or across your face as this will effectively smudge your makeup.

Powder: When using powder it is equally easy to apply with a highlighting brush or your hands. Regardless of your application technique, dispense some product into the lid of your jar and then dip into the powder with a clean finger or brush. Next, just lightly swipe across whatever area you’re intending to highlight.

Where To: Highlighting the correct parts of your face is crucial to achieving a lit from within glow look, also known as strobing. On the face you should highlight along the cheekbones, bridge of the nose, tip of the nose, brow bone, cupid’s bow, & inner corners of the eye. If you’re looking for an all
over shine also lightly highlight your collarbones and shoulders.

Tools To Try: Use our unique Chubby Blender Brush for blush, bronzer, highlighter, contour and even precision foundation application.
Get Your Glow On!♡

Advanced Mineral Makeup Techniques For The FACE

Learn easy ways to sculpt your face shape using advanced mineral makeup techniques  Enjoy!

There are 9 basic facial shapes: Round, Square, Heart, Pear/Triangle, Oblong, Rectangle, Diamond, Inverted Triangle, Oval.

Women_face_shape

An oval-shaped face is considered the perfect facial shape.  It’s easy to achieve an oval-shaped face with nothing more than foundation and powder.

Sculpting the Face to Perfection:

The following technique will add color, warmth and life to EVERY face.  The subtle effect of facial sculpting can
also add a youthful glow to your complexion and make fuller faces appear much slimmer and younger.

Basic facial “sculpting” involves highlighting and contouring the face.  Highlighting or lightening brings everything forward.  Contouring or darkening/deepening makes everything recede.

Through facial sculpting, we pull forward the area of the face we want to see (the oval area) and push back the areas we don’t want to see.

What you need to start: 3 shades of foundation or powder (highlight powder and bronzers) in 3 different DEPTH levels.


  1. First color choice should MATCH your skin exactly- your true foundation color.  For example, let’s say you wear NEUTRAL BEIGE in PRIIA’s Essential Cover Loose Mineral Foundation.
  2. Second choice is your HIGHLIGHT color.  This color should be one level LIGHTER than your first color; preferably with the same undertone. (Your choice would be Neutral Ivory Foundation)
  3. Third choice is your CONTOUR shade.  It should be one level DEEPER; preferably with the same undertone.  Here’s where you can use matte bronzers if you choose.  DO NOT USE BLUSH TO
    CONTOUR. (You could use Neutral Tan Foundation)

To begin sculpting:

  1. Apply the first color (true foundation color) in a light layer all over the face.  Visualize an OVAL on your
    face.  The width of the oval is your eye sockets; the height and length of the oval extends from the tip ofyour forehead to the tip of your chin. The reason behind envisioning an oval is to help see where to
    highlight and contour.
  2. Next, apply your second color (highlight color) to the high points inside the oval.  These include: forehead, under the eyes at the top of your cheekbones (zygomatic arch), and the tip of the chin.
  3. Finally, apply your third color (contour color) to the areas OUTSIDE of the oval such as temples, along the hairline and sides of the cheeks down to the jaw.  Finish off the look with a light dusting of powder in either translucent or one that matches the true skin tone.


*TIP: If you want more of a dramatic appearance (i.e. special events, photo shoots, etc.), then choose a more dramatic contrast between the 3 shade choices.  Just remember, the more dramatic your color choices, the more carefully and thoroughly you’ll need to blend the shades together.

Rule of Thumb: With ivory/beige skin tones, you will CONTOUR more than you highlight.  With bronze/ebony skin, you will HIGHLIGHT more than you contour.