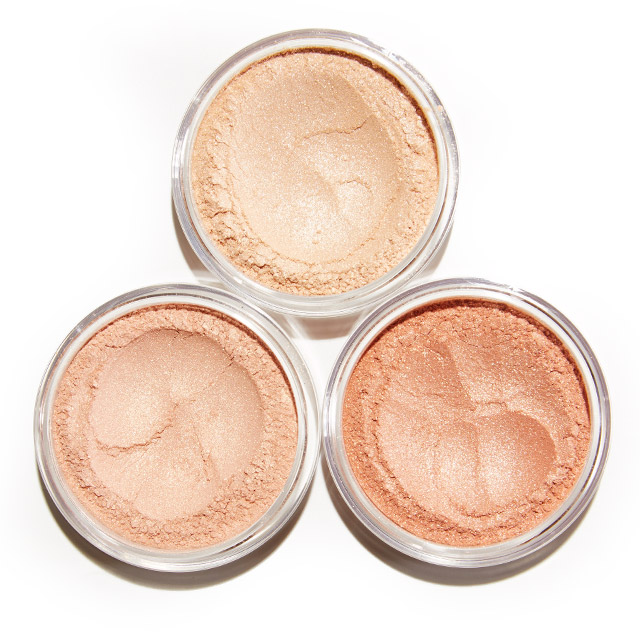
Here at PRIIA we offer two different versions of our LumiLitez Highlighters: creme and powder. Our creme LumiLitez come in the shades Aura and Luna, while our powder LumiLitez come in Moonglow, Starlight, and Sunburst. We offer different versions of our highlighters to allow our customers to achieve varied results if they so wish.
Creme: When it comes to our creme highlighter, application is key. Whether you opt to use a makeup tool or your hands it is important to apply this product gently. Just dot it on the areas you want to highlight and then stipple it lightly with your clean finger or a stippling brush. Do not rub it on or across your face as this will effectively smudge your makeup.
Powder: When using powder it is equally easy to apply with a highlighting brush or your hands. Regardless of your application technique, dispense some product into the lid of your jar and then dip into the powder with a clean finger or brush. Next, just lightly swipe across whatever area you’re intending to highlight.
Where To: Highlighting the correct parts of your face is crucial to achieving a lit from within glow look, also known as strobing. On the face you should highlight along the cheekbones, bridge of the nose, tip of the nose, brow bone, cupid’s bow, & inner corners of the eye. If you’re looking for an all over shine also lightly highlight your collarbones and shoulders.
Tools To Try: Use our unique Chubby Blender Brush for blush, bronzer, highlighter, contour and even precision foundation application. Get Your Glow On!♡
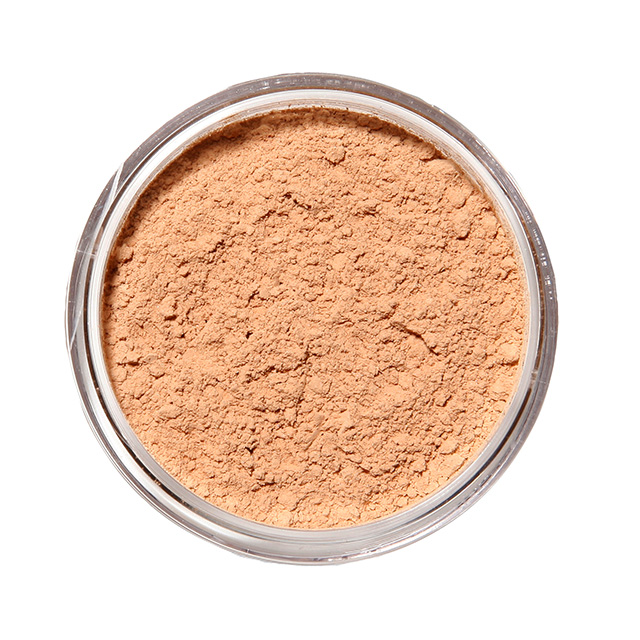
Applying loose mineral foundation? Well all you need to do is ‘swirl, tap, buff’, right? WRONG. PRIIA’s loose mineral foundation is applied differently. It’s a better application process that is more kind & gentle to your skin (especially if you’re acne-prone) AND gives you better results!
PRIIA’s loose mineral foundation is already formulated to adhere really well to the skin so there’s absolutely no need to do any crazy swirling and buffing. All you need to do is our easy-to-learn 3-step ‘Stamp & Blend’ technique!
Dispense a few sprinkles of foundation into the lid of your jar OR into your Minerals Mate Tray.
Dip the head of our synthetic Flat Top Brush into the dispensed minerals making sure to really press the brush head into them. You want the minerals to be loaded well into the brush head.
Starting at the outside edges of your face, gently ‘stamp’ the brush head onto your skin and then go back and blend downward in one direction. Go back and repeat this process working toward the inside of your face until you reach your desired coverage. PS- blending downward also helps to lay fine facial hair flat giving the skin an overall better appearance!
That’s it! It’s so easy! Here’s a few extra tips to help with you this application method:
Before applying your loose mineral foundation make sure that any skin care products you’ve put on your skin have had a chance to fully absorb. If not, your minerals will adhere to spots making the end result look patchy and splotchy.
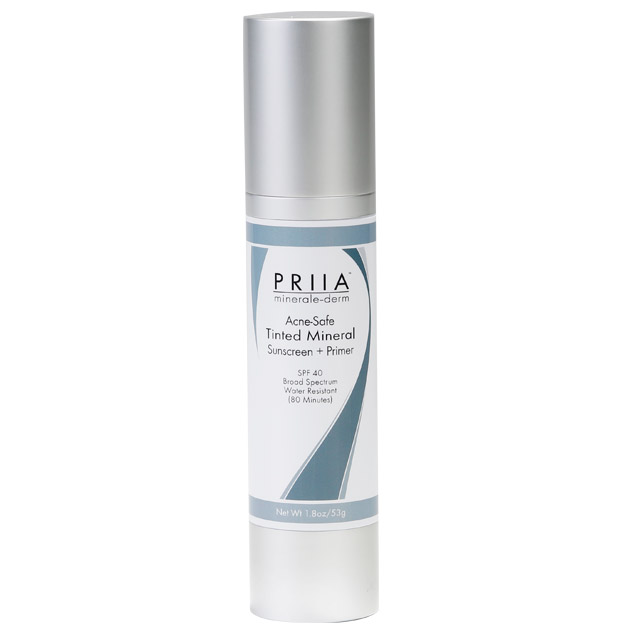
Apply our Acne-Safe Foundation Primer BEFORE loose mineral foundation application to increase the longevity of your foundation. All you need is a pea-sized or less amount of primer to get the job done.
Got large pores? Make sure to really press the foundation into the areas of your face that have enlarged pores (generally this is in your T-Zone). Basically, you’re “filling in the holes”. Don’t worry- our products will NOT clog your pores so press away!
When you’re short on time but need to look flawless, here’s a super easy and fast way to get the job done in five minutes or less!
After cleansing and toning, apply our Acne-Safe Tinted SPF40 + Primer all over your face. This product serves as a substitute for a light foundation, SPF and primer all-in-one! Tip: Be sure to wash your hands right after you apply this product as it may stain some fabrics.
Next, apply concealer to any areas that need some extra attention such as under the eyes and blemishes. You can use PRIIA’s creme concealer right out of the tube and blend with your fingers or you can use our loose mineral foundation with our Wet/Dry Concealer Brush.
Third, apply a light dusting of our Behave Finishing Powder in Tinted or Untinted all over the face. If you’re prone to excess oiliness during the day, use our HydraPrime Oil-Control Powder instead.
Fourth, apply a little bit of our Vacation In a Jar Loose Mineral Bronzer to areas where the sun would naturally “kiss” your face. Or use the bronzer just on the apples of your cheeks in place of your regular blush.
Next, apply our Lip Treatment Balm in Tinted or Untinted to keep your lips protected and feeling baby soft all day.
Lastly, apply one to two coats of your favorite mascara.
Every so often we have a customer contact us to say that no matter what they do their PRIIA makeup seems to ‘slide’ off within a few hours. The first questions we ask them are: “What skin care products are you using?” “What is your skin care routine?” “Which PRIIA minerale-derm products are you using?” We ask these questions because PRIIA’s formulas are made to adhere to the skin. We have thousands and thousands of customers who successfully use our products without incidence so we know that 9 times out of 10, makeup slide is due to ‘user error’.
More than 99% of the time we find out that customers are using inappropriate products for their skin type and/or they’re layering one product after the other and not letting those skin care products absorb properly. When you’re using skin care products that are too ‘heavy’ for your skin type or you haven’t given the correct products a chance to fully absorb, your makeup can’t adhere properly. This goes for ANY makeup- not just PRIIA.
Here’s how to correct the situation…
Make sure you’re using skin type appropriate products. Heavy, oily-based skin care products don’t absorb properly and tend to just sit on the surface of the skin. Likewise, skin care products that are too harsh can adversely affect the skin barrier causing an over-production of sebum throughout the day. When using appropriate skin care products don’t use too much. Use only the recommended amount. Too much of a good thing isn’t good. You’re simply wasting product AND money.
Before applying primer and/or foundation, wait AT LEAST 10-15 minutes for your moisturizer/SPF to fully absorb. Your skin should NOT feel wet or overly tacky. It should feel soft and mostly dry to the touch. While you’re waiting for your products to absorb go brush your teeth, get dressed, have breakfast, etc.
Once your skin care products have absorbed properly apply your makeup in light layers. Remember that you can always go back and add more but you can’t take away if you’ve applied too much to begin with.
When using our acne-safe primer only use a pea-sized amount (about a half pump’s worth) for the entire face and use less around areas of the face with a lot of creasing (i.e. the sides of the nose). We’ve had customers tells us that their using a couple pump’s worth at one time! WOAH…don’t do that! Again, too much of a good thing isn’t good.
If you’re an oily-skin gal, consider using our HydraPrime oil-control powder to ‘set’ your makeup and to help absorb oily breakthrough during the day. If you have combination skin, our BEHAVE Finishing Powder is a great product to help balance your complexion and complete your look.
Give your complexion a refreshing hydrating boost during the day with our Hydrating Skin Spritz! It instantly delivers moisture while helping to lock down makeup.
If you’ve tried the above suggestions and you’re still experiencing problems, consider making an appointment with a licensed skin care professional. They can examine your skin properly and assist you in choosing the correct products for your skin type and skin condition.
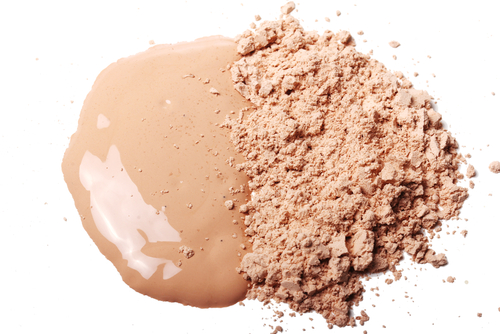
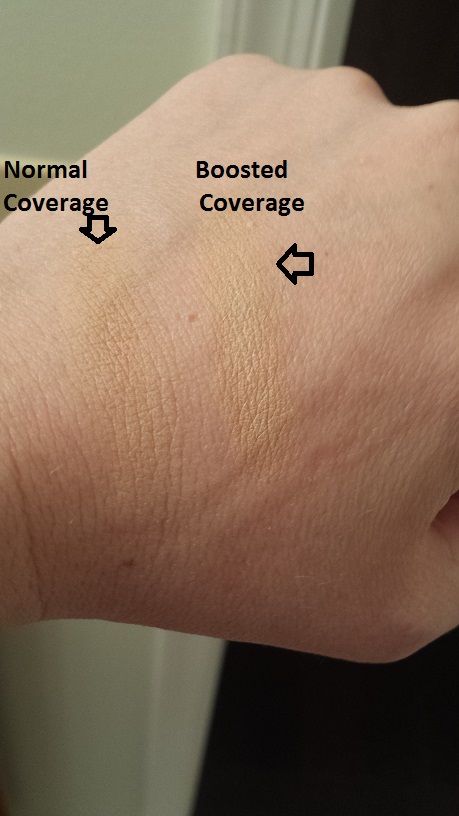
Liquid Foundation. You either love it or hate it. Unfortunately many, if not most, liquid foundations aren’t a good idea for acne-prone skin because of pore-clogging ingredients. At PRIIA we currently don’t offer a liquid foundation (yet). However, we’ve got an easy way for you to take your PRIIA loose mineral foundation and turn it into a full-coverage liquid foundation.
It’s called ‘The Boosted Coverage’ Technique. All you need are 3 items: PRIIA’s Loose mineral foundation, PRIIA’s Hydrating Skin Spritz and PRIIA’s vegan synthetic flat top foundation brush.
Step One: Dispense some loose mineral foundation into the lid of your jar or in your Minerals Mate Mixing Tray. Step Two: Generously spritz the head of your flat top brush with our Hydrating Skin Spritz. About 4 to 5 spritzes should do it. Step Three: Dip your dampened brush into your loose mineral foundation. Use a second well in your Minerals Mate Tray or a second jar lid to swirl around your brush head. This will help evenly mix the spritz with the minerals. Step Four: Apply to clean & moisturized face. Apply as many layers as needed to achieve your desired coverage.
To see ‘The Boosted Coverage’ Technique in action, watch our tutorial here: https://youtu.be/cDI3NfiTTSg
There’s actually several ways to do this such as: adding multiple layers of loose foundation and layering our loose and creme foundation together. However, today we’ll teach you how to do the ‘Boosted Coverage Method”. It’s so easy and perfect for those who use our loose mineral foundation for stage makeup and for those with severe acne/facial redness/hyperpigmentation.
Boosted Coverage Method (excellent for severe acne coverage, stage makeup, bridal, special events)
1. Dispense PRIIA’s loose mineral foundation into the lid of the jar.
2. Lightly mist your Flat Top Brush or Flat Top Buki with a favorite gentle toner (non-acid based) or DISTILLED water (do not use tap water).
3. If the brush is too damp, gently blot off any excess moisture on a tissue or the back of your hand.
4. Dip the brush head into the lid to pick up the product.
5. Apply the product using PRIIA’s signature ‘Stamp & Blend’ method making sure to work quickly and blend out evenly into the hair line, past the jaw line and down onto the neck.
We hope you enjoyed this product tutorial. If you have any questions or need assistance, please feel free to use the CONTACT US form at www.priia.com.
Are you getting married soon? Are you a bridesmaid in a wedding? Do you know someone who is getting married? Are you doing the makeup for a bride and/or her bridal party? If you answered “yes” to any of these questions, then you’ll want to take notes. I’m about to share with you some of the BEST bridal makeup tips for the season.
If you’re a bride, did you know that the time of day you’re getting married directly correlates to how your makeup should be worn? Yes, it’s true. Pay attention to what I’m about to share with you so that you can look your very best on such a special occasion.
Morning Brides:
If you’re getting married in the morning, there is a lot of natural light that always tends to photograph with more of a ‘blue’ hue. Less is more when it comes to makeup for a morning bride. It’s the perfect time of day for “natural girls” to get married; not so much for someone with less-than-perfect skin.
Matte foundation is always a good choice for photos but morning brides can also opt for something that has a slight sheen or dewiness to it, because the morning light offers a nice softness. Do not use a lot of powder and/or concealer as it will not photograph well. The goal for a morning bride is to choose a color palette that is warm, soft and subtle on all areas of the face. Make sure to blend everything well and consider false lashes to define the lashline instead of a heavy layer of eyeliner.
Midday Brides:
During the middle of the day, the sun is directly over head which can be harsh and cast shadows. Just like morning brides, if your skin is less than perfect, it’s not the optimal time to get married. Also, if you have very deep-set eyes, midday lighting can make your eyes look like “black holes” if you don’t choose the correct colors and/or you don’t blend your makeup to perfection.
Midday brides should not wear foundation that has any sheen to it- stick to a matte finish. Blush should be matte as well; creme blush is a great option. However, if you have oily skin, stick with a powder blush that is matte. The highlighter shade for the eyes should have a shimmer to it- no frost. The midtone and accent color for the eyes needs to be matte. If you do wear eyeliner, keep it extremely close to the lashline and blend, blend, blend. For a midday bride, there is no such thing as overblending! You can also consider using false lashes to define the eyes instead of worrying about the possibility of eyeliner looking too harsh.
Late-Afternoon Brides:
This is one of the best times of the day to get married! The sun is beginning to set and it casts as beautiful golden light on everything it touches. Photos comes out the best in this type of natural lighting. A late-afternoon bride can choose to be a little more dramatic with her makeup application. Also, she can wear more powder and concealer to cover up flaws without worrying about looking overly made up.
Since evening is just on the horizon, a photographer will most likely use a flash for pictures. Make sure to wear enough blush so that you don’t look washed out in your photos. You can choose to use a light application of bronzer as well to add a warm, soft glow.
Late-afternoon brides get the “A-OK” to wear richer colors because they don’t show up too intense in photos at this time of day. Your blush can have a shimmer-effect to it and your eye highlighter should be a shimmer as well- no frost. Choose a matte hue for your midtone and/or accent eye color. Never use a shimmer for all 3 colors because your eyes will photograph too shiny. Lastly, you can wear more eyeliner and false lashes should definitely be used for some added glamour.
Evening Brides:
Ah, if you’re a “drama queen”, then this is the time of day for you! You can most certainly glam-it-up with color and application. Smoky eyes are a great choice for evening brides- just remeber to go neutral on the lips.
The key to evening bridal makeup is to make sure everything is well-defined: eyes, lips and cheeks. However, well-defined DOES NOT necessarily mean you have to go darker with colors. You can add more drama with brighter colors, bronzer and also from contouring your face. Remember, all photos will be taken with a flash so you want to avoid looking washed out and ‘flat’. Choose eye colors with flair and shimmer but NO frost in order to avoid looking overly shiny. False lashes are really a must-have for evening weddings because they really help to define the lashline. Also, if you have very light brown to blonde hair, make sure to use a brow definer so that your brows show up in the photos and don’t get washed out by the camera’s flash.
Bridal Makeup Quick Tips:
-Bridesmaids should NEVER be more made up than the bride- no exceptions.
-Bridesmaids’ makeup doesn’t have to match- just the intensity of the makeup has to match.
-ALWAYS do a trial run for hair and makeup!
-Get bridal ready in this order: Hair then makeup then dress
-If you dont’ like false lashes or can’t wear them, just be sure to curl your lashes really well and then layer your mascara to get really nice defined eyes.
-If a bride and groom lick their lips before they kiss, the lipstick will not transfer. (yes, this really does work!)
If you follow the advice I’ve given you, your wedding day look AND photos will be picture-perfect!
Learn easy ways to sculpt your face shape using advanced mineral makeup techniques Enjoy!
There are 9 basic facial shapes: Round, Square, Heart, Pear/Triangle, Oblong, Rectangle, Diamond, Inverted Triangle, Oval.
An oval-shaped face is considered the perfect facial shape. It’s easy to achieve an oval-shaped face with nothing more than foundation and powder.
Sculpting the Face to Perfection:
The following technique will add color, warmth and life to EVERY face. The subtle effect of facial sculpting can
also add a youthful glow to your complexion and make fuller faces appear much slimmer and younger.
Basic facial “sculpting” involves highlighting and contouring the face. Highlighting or lightening brings everything forward. Contouring or darkening/deepening makes everything recede.
Through facial sculpting, we pull forward the area of the face we want to see (the oval area) and push back the areas we don’t want to see.
What you need to start: 3 shades of foundation or powder (highlight powder and bronzers) in 3 different DEPTH levels.
Second choice is your HIGHLIGHT color. This color should be one level LIGHTER than your first color; preferably with the same undertone. (Your choice would be Neutral Ivory Foundation)
Third choice is your CONTOUR shade. It should be one level DEEPER; preferably with the same undertone. Here’s where you can use matte bronzers if you choose. DO NOT USE BLUSH TO
CONTOUR. (You could use Neutral Tan Foundation)
To begin sculpting:
Apply the first color (true foundation color) in a light layer all over the face. Visualize an OVAL on your
face. The width of the oval is your eye sockets; the height and length of the oval extends from the tip ofyour forehead to the tip of your chin. The reason behind envisioning an oval is to help see where to
highlight and contour.
Next, apply your second color (highlight color) to the high points inside the oval. These include: forehead, under the eyes at the top of your cheekbones (zygomatic arch), and the tip of the chin.
Finally, apply your third color (contour color) to the areas OUTSIDE of the oval such as temples, along the hairline and sides of the cheeks down to the jaw. Finish off the look with a light dusting of powder in either translucent or one that matches the true skin tone.
*TIP: If you want more of a dramatic appearance (i.e. special events, photo shoots, etc.), then choose a more dramatic contrast between the 3 shade choices. Just remember, the more dramatic your color choices, the more carefully and thoroughly you’ll need to blend the shades together.
Rule of Thumb: With ivory/beige skin tones, you will CONTOUR more than you highlight. With bronze/ebony skin, you will HIGHLIGHT more than you contour.
You’re getting ready to go out for a night on the town when you discover a large, red pimple smack in the middle of your nose. You frantically search your makeup bag for your handy-dandy PRIIA face concealer only to realize you’re all out. All you have is your PRIIA loose mineral foundation. What’s a girl to do???
Have No Fear- The Mineral Makeup Coach is Here!
First, take a deep breath (just not over your opened jar of loose minerals, please). All you need for this seemingly impossible task is your PRIIA loose mineral foundation. Say what??? Yes, you heard that right and here’s your step-by-step instructions…
Do your normal foundation application with our skin-loving flat top foundation brush. Wait a few seconds to let the minerals begin to work with your skin’s own natural chemistry. Next, take our taklon concealer brush and gently dip it into your Essential Cover loose mineral foundation. Make sure to really work the minerals into the brush. Take your concealer brush and gently pat it onto the problem area until it’s completely covered. Don’t swipe it on and don’t stray too far “outside the lines”. Make sure to blend any obvious edges. You can ‘set’ this concealer trick with some HydraPrime or Behave Finishing Powder using the same concealer brush or clean fingers.
Voila! Your problem is GONE– at least visually it is.
You see, covering up a raised area of skin such as in the case of a blemish or keloid-type scar, can be difficult. The reason being is that the pore or pores are stretched making it sometimes tricky to cover them successfully with a cream-based product. It just seems to slide around and not ‘stick’. Our Loose Mineral Foundation is made to adhere to the skin and that’s why this trick works so well.
Another added benefit to using your PRIIA loose mineral foundation to cover these types of problems is that you will have an EXACT match to the rest of your face. I cannot tell you how many times I’ve seen botched concealer jobs on women. They either choose a concealer that is too light or too dark for their skin tone. In either case, the problem they are trying to cover up is only made MORE noticeable. Don’t make this mistake. You’ll only having people staring at you funny. Trust me on this.
So there you have it. Another makeup emergency solved. If you haven’t tried PRIIA’s fabulous products, what are you waiting for? Get on over to www.priia.com and get yourself some samples. You can thank me later.
Yesterday I asked if you knew the answer to the question: "What's the correct method for applying blush?"Two choices were offered: Apply from the 'apples of your cheeks back to the hairline or vice versa…
The correct answer is: Apply from the hairline towards the 'apples' of the cheeks. Why? It's because the greatest amount of product is deposited on the skin at the first application. So, you wouldn't want a 'blob' of blush plopped onto the apples of your cheeks. Starting back at the hairline will give you a softer, more natural appearance. Plus, if you have a little too much product at the start, you can easily blend it into the hairline as opposed to trying to blend it out on the actual cheek area.
Question:Was this application tip helpful to you? Let me know by leaving a comment below. Thank you!
If you enjoy reading The Mineral Makeup Coach Blog, please feel free to share the home page with your friends using this link:http://tinyurl.com/5eqd9q.